This page explains how to draw a timeline from data in a spreadsheet. If you
are going to enter the data, then you should see the Web page How
to Draw a Timeline.
1. Run Your Spreadsheet program
Run Microsoft Excel or whatever spreadsheet program you are using and open the
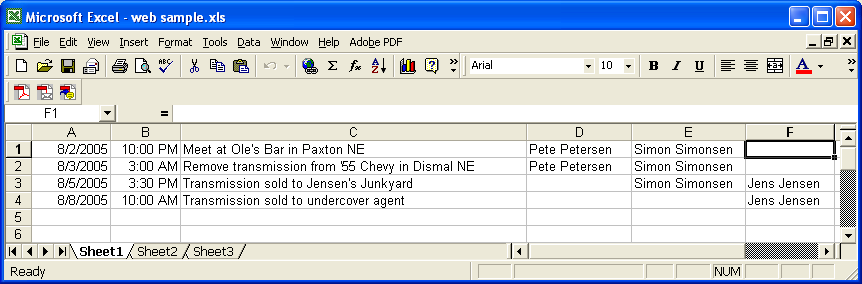
file with the data. Make a note of what columns in this file contain the date,
time, event, and entities. In the sample below the date is in column A, the time
is in column B, the event is in column C, and the entities are in columns D, E,
and F. You can select any columns you wish to enter the data. For example, the
event could be in column A or B or C or .... The date must be in the format
"
3/14/1998." The time must be in the format "
1:30 PM."
The time is optional, but
you must identify a date and an event. The event describes what happened. The date is the date the event
happened. The entities are the people involved. You can have commas in your data
since Excel will place quotation marks around an entry that contains commas. Save this file as a .csv
(comma separated variable) file and make a note of what folder it is saved in.
2. Run Timeline
In RFFlow click
Tools,
Auto Charts, and
Enter Timeline Data.
The Timeline program will run. This feature is included in both the
free
trial version
of RFFlow and the full version. If you are doing a lot of timelines, you will want to put
the timeline buttons on your toolbar. Click
View in the main menu of
RFFlow,
Toolbars, and customize the bottom row of buttons to add the
timeline buttons

and

.
The
Edit Timeline button allows you to enter new timeline data or edit
data you have already entered.
3. Assigning Columns
In the Timeline program, click
Tools and
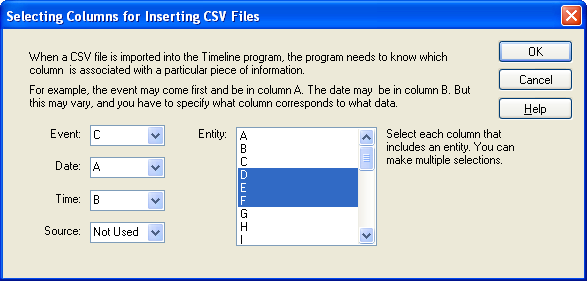
Select CSV Columns. The
dialog box shown below will appear. In this dialog box you are telling the
program which column contains what data. For example, the Event data is in
column C of our spreadsheet, so we select C for the Event. If there is no
time column in your spreadsheet, select "Not Used." As stated
before, you must have at least a date column and an event column in your
spreadsheet. Click the
OK button when you are
finished with this dialog box.
4. Inserting the Data
Next you click
Insert,
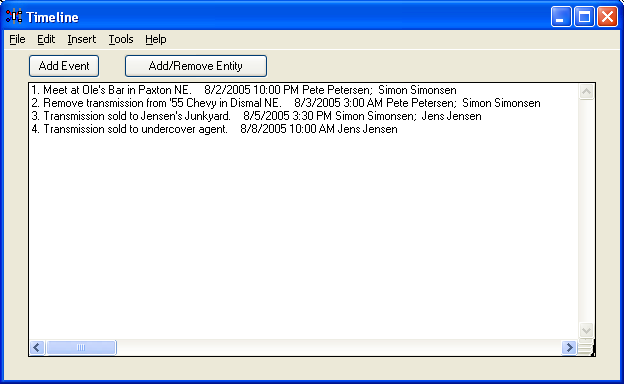
CSV File in the Timeline program and insert
the .csv file you saved earlier. After opening the .csv file, our sample data
inside the Timeline program is shown below. You could edit it at this time, but
then your spreadsheet data will not match your Timeline data, so it is best to
edit the spreadsheet data.
5. Adding a Title
You can add a title and other information to your timeline by clicking
Tools in the main menu of Timeline, and
Add Title. The dialog box that appears allows you to enter a
title for your timeline and to enter case information.
Case information is only used in criminal analysis timelines. The
title and case information will be added to the
timeline when it is drawn in RFFlow.
6. Saving Your Data
After entering all the information, you need to save this data to a file on your hard drive. Click
File in the main menu of Timeline and
Save in the drop-down menu. The
Save As dialog box will appear.
You need to save your data so you can import it into RFFlow to create a
timeline. You may also want to edit the data later adding
entities or events.
The folder where your data will be saved is shown to the right of the words
Save
in:.
To save in a different folder, click on the triangle pointing down to the right of the words
Save in: and select a different folder. You can move up a folder by clicking

.
Remember where you saved the file so you can find it again
in step 8 below.
Type the name of the file into the box near the words
File name:. Just type the file name.
The extension .txt will automatically be added. The files used by
Timeline are text files like those created with Microsoft Notepad.
7. Drawing the Timeline in RFFlow
After saving the data in a text file, you then import the file into RFFlow. RFFlow creates the
timeline. In RFFlow, click
Tools,
Auto Charts, and
Draw Timeline, or click the
Draw
Timeline
button.
8. Opening the Text File
The timeline data was saved in a .txt file. You have to be able to browse to the folder where you saved your file
in step 5 and open it. The
Open dialog box will appear.
The folder whose contents are displayed is listed to the right of the words
Look
in:. To change folders, click on the triangle pointing down and
choose a new folder. You can move up one level in the hierarchy of folders by clicking
.
Once you are displaying the correct folder, simply click on the name of the file and click the
Open button.
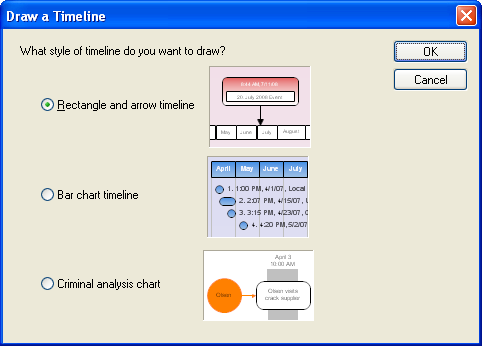
9. Selecting a Timeline Style
RFFlow has three different styles of timelines. You can always try one and if
you don't like it, try another one.
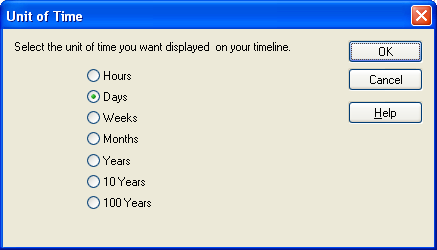
10. Selecting the Unit of Time
Next you select the unit of time you want displayed. This selection has a
big effect on the size of the timeline. If your timeline is too large, select a
larger unit of time.
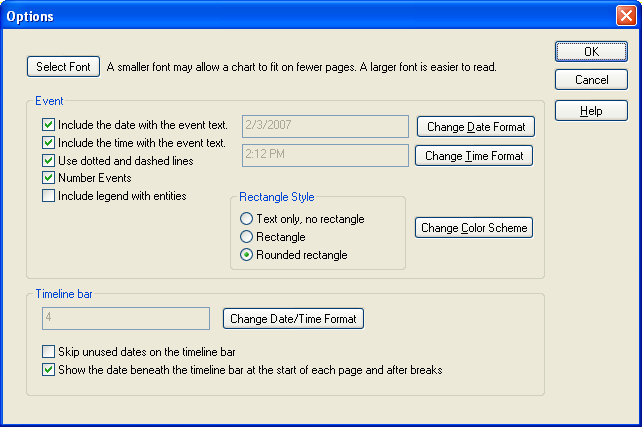
11. Selecting Timeline Options
The Options dialog box is shown above. There are a lot of ways to customize
your timeline. If you are in a hurry, you can always just use the defaults
and click the
OK button.
- Font - You can use the current default font or select a different one. A
smaller font generally results in a smaller timeline.
- Date - You can either show the date with the event text or not show it.
The format of the date can also be changed. You could show dates as 2/3/2008
or as October 3, 2008. You can make your own custom display of the date.
Remember that longer text makes the timeline larger.

- Time - You can either show the time with the event or not show it. If you
show it you can select how it should be shown. You might prefer a 24-hour
clock and show 14:00 instead of 2:00 PM.
- Dotted and Dashed Lines - In the rectangle and line style, it is helpful
to alternate between different line styles to make it easier to follow the
line from the rectangle to the timeline bar.
- Number Events - This is helpful if you have to discuss the timeline in a
meeting. You can then refer to event number so and so.
- Include legend with entities - If you want to show what people are
involved with which events, this should be checked. For example, if the
event is "Write Financial Report" and the person responsible is
Jens Jensen, then the rectangle with "Write Financial Report (B)"
would include a letter and the letter would be listed in the legend as
"(B) Jens Jensen."
- Rectangle style - You can use standard sharp edged rectangles, rounded
rectangles, or no rectangle at all.
- Change Color Scheme - You can select the color of your timeline. These
schemes provide matching colors for the rectangles and background.
- Timeline bar date format - The timeline bar extends across the timeline. One
is shown below. This option allows you to select different date formats.
- Timeline bar - Skip unused dates. For example, assume you are showing days
and the first event is October 2nd and the next is October 5th. You can show
each day or skip days which are not connected to an event.
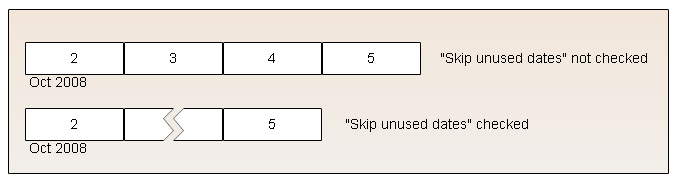
- In the figure above, the days are numbered 2, 3, etc. The actual date
"Oct 2008" is shown beneath the timeline bar. You can select to
show this date or not.
Criminal Analysis Timeline Options
For a criminal analysis timeline the options are somewhat different and the
dialog box is shown below.
- Change Line Style - You can change the style of the arrow that connects
entities to events.
- Source Information - To include source information, you need to put a
check mark beside Include source information. You can also choose
which letter is used in the source information list. For example, if you
choose the letter "S", then event 3 would read "Meeting of
Southside Gang (S3)" and the source list would be labeled S1, S2,
S3, and so forth. The list of all the sources is copied to the Windows
Clipboard when the timeline is generated and can be pasted into your word
processor.

12. Editing the Timeline in RFFlow
Once the timeline is generated, you can edit it like any other RFFlow
chart. If you want to make the title font larger, simply double-click the
title and change the font size. You can add text and lines to highlight parts of
your timeline and move events around. The full editing capability of RFFlow is
available.
13. Finished
At the end of this process, you will have generated two files.
One is the text file (.txt) where you saved the data.
That file was generated by the Timeline program. The other file
is the RFFlow file (.flo) which contains the actual
timeline graphics. Both should be saved as you may want to
edit the timeline data and generate another timeline.
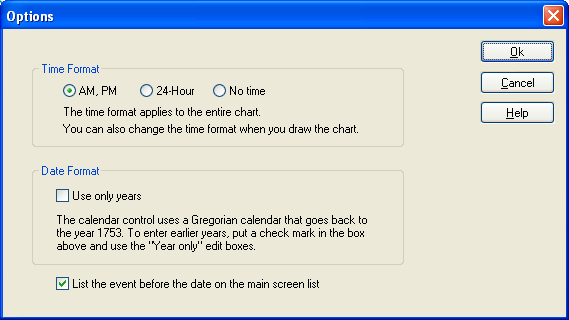
14. Other Options of the Timeline Program
If you click on
Tools,
Options in the Timeline program, the
dialog box shown below will be displayed.
- Time Format - When you enter the data, you can use 24-hour time, AM
and PM, or not enter the time at all. This only affects entering the data.
When you draw the timeline in RFFlow, you can change the time format at that
time also.
- Date Format - If you are doing a historical timeline with dates before
the year 1753, then you need to use years only.
- Event and Date Order - This allows you to either list the event
first or the date first on the main screen of the Timeline program. It only
affects that display and not the timeline generated in RFFlow.
See also: